

How To Make A Bear With Clay
How to Make a Koala Conduct in Polymer Clay
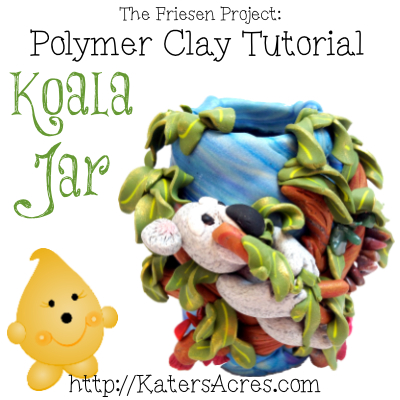
This project was so much fun to exercise and to create! Information technology is now my joy & pleasure to share it with all of you! I really honey any kind of animal that has that cuter than cute look near them … and the Koala acquit is definitely one of them. This koala bear tutorial can exist done as shown above or as a free standing sculpture, the choice is yours. Without further ado … permit's get started!
As with all the tutorials in the Friesen Project, please remember that these tutorials are done in an abbreviated format, with Christi Friesen's expressed permission. These tutorials are written and designed to be used in conjunction with the Beyond Sculptures Book 5: Downward Nether.
Materials:
-
 Christi Friesen's Beyond Projection Sculpture Series Book v: Downward Under
 - Your choice ofpolymer clay
- Tissue Blades
- Mica Powders (Several Options – My preference is Perfect Pearls as they are permanent & practice not crave a end due to the resin )
- Perfect Pearl Set (I recommend the set with bluish palette called "Cafe")
- Variety of Chalks & Inks to use every bit accents
- Acrylic pigment in a dark colour – my preference is brown or sienna
- Acrylic paint castor (delight use a different castor for mica powders, chalks, pigment, & gloss finishes)
- Babe wipes or soft sponge
- Tiny-medium sized beads and/or gemstones for optics and embellishments
- Varnish
- Metal Craft Wire (I prefer 24-28gauge but any flexible soft wire volition do)
- Sculpting tools
- Craft Oven (I employ a Toaster Oven)
Koala Deport Tutorial Instructions:
Making the Koala Bear:
If you lot want to add your Koala to a jar as in my example for this tutorial, complete instructions for covering a jar in an organic fashion are detailed here .
-
 Gather your polymer clay in any color you wish your Koala to become (greys and tans piece of work best and are about realistic).
 - Condition all your clay.
- Begin by creating a background for your Koala in any manner you wish.
- My Projection: My groundwork was a covered jar, get the tutorial for that here.
- Make "wood grain" or trees for your Koala to sit, perch, eat, or sleep on – this is a separate tutorial that you can find here (photo is in the upper left).
- My Project: For my Koala I made trees for him to sit back, arctic, and eat some grub on.
- Make a basic "egg shape" for your Koala'south torso.
- Brand another "egg shape" for your Koala's head and an "Southward" shape for your Koala'due south leg.
- View this tutorial to make your legs – they are similar to dragon legs.
- Once your leg is shaped do not forget to add his toes … he tin can't climb copse without toes!
- Make a large blackness nose and set up information technology most halfway down.
- So make two circles and attach for ears.
- Add together lilliputian pink dots of clay or use mica powders to add some pink inside your piddling guy'south ear.
- Make 2 very pocket-size white circle for behind his optics and afix to your Koala's caput, directly opposite the olfactory organ and shut to it.
- Now make 2 arms from snakes and add fingers, meet this tutorial to make an arm.
- Using Christi's book on pages 21-22 add hanging Eucalyptus flowers to your Eucalyptus tree.
Add Details:
The difference between an artist and a crafter are the details!
-
 Now comes the fun part … the details!
 - Apply your imagination and be artistic …
- If you are stuck, ask yourself these questions:
- What is my Koala doing? Eating, sleeping, climbing…
- What is my Koala thinking? I'm hungry, I'm ornery, I'1000 scared…
- What kind of an attitude does my Koala have? I'm kind, I'grand gentle, I'm hyper…
- If you are stuck, ask yourself these questions:
- My Projection: My Koala was hungry and lazy …. so I wanted to portraying him relaxing in a tree and eating tons o' leaves! And then I put a branch in his arms with leaves everywhere.
- To make the Eucalyptus leaves for your Koala carry, yous can make the leaves straight from Christi's book on pages 18-xix.
- Other leaves: If you want to add unlike leaves, go to this tutorial and add together some of these little guys!
- Add as few or as many leaves as you want.
- TIPS: Make some coming out of random places, nooks & crannies of your tree design, or add some directly to your Koala's hands!
- NOTE: Recollect THAT YOUR Slice IS Non PERMANENT UNTIL Yous BAKE Information technology – IF Yous DON'T Like IT, Attempt Once more!
- You volition notice that my Koala's caput inverse positioning … why? Because I idea he looked to "fake" staring straight at me … so with the removal of an ear and the rearranging of his head … nowthat looks meliorate!
- Last but non least – Add the gemstones baby!
- I used chips of the following: tigers eye, agate, goldstone, jasper, & jade.
- Bake in an oven covered with foil at 265 degrees for hr.
- End off your piece by sealing your entire projection in a glaze of varnish.
- Don't forget to SIGN UP to get more than Costless tips, tricks, & tutorials in your e-mail!
[hr /]
The Friesen Projection
The Friesen Project is done in conjunction with Christi Friesen. All tutorials are retaught hither with her expressed permission. Please brand sure to read nigh the projection here, and become answers to the most common FAQS here.
Run across you next Friesen Friday,
Until then, Happy Claying,

Save Save
Source: https://katersacres.com/polyclay/friesen/koala-bear-tutorial/
0 Response to "How To Make A Bear With Clay"
Post a Comment